Are you sick of seeing dirty grout that keeps on standing out, regardless of scrubbing? You’re not alone—and the good news is, there is a solution.
Once you choose the right grout-cleaning brush and apply a few helpful tactics, your grout lines will seem new again. Effective use of your brush can tackle mildew and dirty areas in both the bathroom and kitchen. Once you understand the process, cleaning your grout will feel much simpler (and rewarding).
With these five tips, you will learn how to effectively clean your grout by choosing suitable brushes and using the right moves. Are you prepared to part with tough stains and welcome shining tile?
Let’s begin.
1. Choose the Right Machine with a Suitable Brush
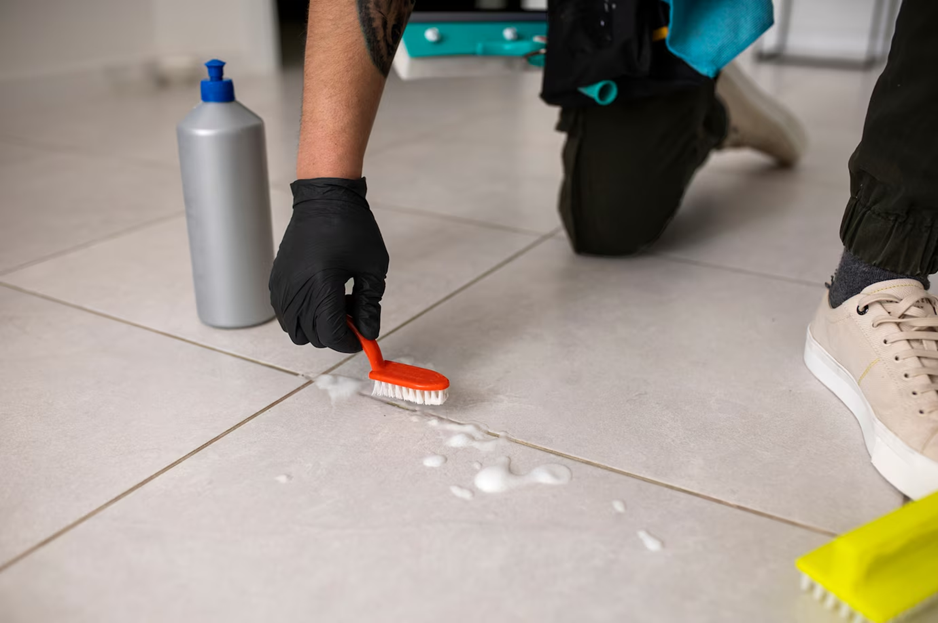
The best results of cleaning grout start with the right brush. Therefore, it is imperative that you invest in a grout machine that gives you access to a quality grout cleaning brush.
Make sure the brush is made of nylon bristles, for they are safe and easy to use for scrubbing dirt out of the grout lines. In addition, a narrow-angled head brush helps you reach deep into grout lines, including corners and tight spaces filled with dirt.
Moreover, handles deserve more attention—comfort grips of the right design can be helpful during extended cleaning sessions. Do not use metal bristle brushes; they erode grout and may leave unsightly and permanent marks on the surrounding service.
Investing in a top-notch grout cleaning kit ensures that cleaning is easy and effective, saving you time and effort in the long run.
2. Pre-treat the Grout
The grout requires special attention before scrubbing to make the process more efficient. Applying a cleaning paste, dipping soda in water, hydrogen peroxide, and soap can alleviate the process. Grime, mold, or soap scum needs cleaning as well to avoid dirty scrubbing.
Note that the scrubbing process requires less effort if dirt is already in a loose state. When the stain is hard to remove, white vinegar or a special cleaner for grout can help. A good idea is to test any cleaner on a small area so you don’t run into issues later. Letting your grout soak will help you clean it more effectively and easily as you begin scrubbing.
3. Use Proper Scrubbing Technique
Like with any task, the method and tools used for scrubbing matter when it comes to cleaning the grout. Start with concentrating on one small section at a time. This pace will help you work with focus, ensuring no gaps are left unattended. Grout brushes must be held firmly while maintaining consistency with the pressure applied.
When scrubbing, always do so along the grout lines and not across them, as this helps to loosen dirt without damaging the tile edges. A back-and-forth movement is most effective as long as speed is avoided; slowing down allows the cleaner and brush to do most of the work.
If stubborn stains rest deep within the grout, make several scrubbing passes with a power scrubber drill. Steady progress checks are essential. Remember that these methods won’t work on stains or mold that have been neglected for years.
4. Rinse and Wipe Immediately
After scrubbing, you must rinse and wipe the area right away. Don’t let dirty water or leftover cleaning solution sit on or near the grout lines—it can leave behind a sticky residue that attracts more dirt.
Use a clean, damp cloth or sponge to wipe down the grout lines and surrounding tiles. Then, rinse the area with fresh water to ensure all cleaners and debris are removed completely. You can use a spray bottle of water for small areas or a mop and bucket for larger sections.
Make sure to change the water regularly to avoid spreading grime around. If needed, go over the area again with a dry cloth to remove any excess moisture. By rinsing and wiping immediately, you’ll get a cleaner result and prevent residue buildup that could undo all your hard work.
5. Seal the Grout After Cleaning
Once your grout is clean and completely dry, applying a grout sealer is a smart idea. Sealing helps protect your grout from moisture, stains, and mold, keeping it cleaner for longer. You can choose from spray-on or brush-on sealers—just make sure they are compatible with your type of grout. Apply the sealer evenly along the grout lines, following the product instructions carefully.
Be sure to wipe off any excess from the tile surface to prevent haze or streaks. Let it cure fully, usually for 24 hours, before using the area again. This step might seem optional, but it’s one of the best ways to extend the life of your grout and reduce how often you need to deep clean. For high-traffic areas like kitchens and bathrooms, plan to re-seal every 6 to 12 months for optimal protection and lasting results.
Bottomline
By following these essential tips, you’re setting yourself up for grout cleaning success that’s both effective and long-lasting. With the right brush, proper pre-treatment, thoughtful scrubbing technique, immediate rinsing, and sealing afterward, you’ll keep your grout looking fresh and spotless.
Remember, grout cleaning doesn’t have to be a dreaded chore—it’s all about working smarter, not harder. When you treat your grout with care and consistency, you protect your investment and elevate the overall look of your space.