
Caches make your Mac faster, but eventually they accumulate and cause slowdowns, errors on websites, or storage problems. Knowing how to clear the cache on a Mac is crucial for everyone. In case web pages are not loading properly, then clear your browser’s cache.
If your Mac is slowing down or your hard drive is full, delete system and application caches. When the network is misbehaving, empty your DNS cache. This is a quick and simple guide on how to empty cache on Mac without damaging data: how to do it manually, using one-click cleaner programs, etc.
Part 1. Why clear cache & what you might lose?
Caches are temporary files stored by your system and apps to speed up performance. Over time, these files grow large or become outdated, causing errors, slower loading times, or wasted disk space. When you remove cache files Mac periodically, it helps keep your Mac responsive.
Pros of clearing cache:
Frees up valuable disk space.
Fixes display or loading errors on websites and apps.
Refreshes system performance.
Cons or risks:
Some websites may sign you out or forget your preferences.
Apps may need to reload thumbnails or data.
First load after clearing can be slightly slower.
Overall, clearing caches is safe when done carefully. Just back up or note app-specific data first and avoid removing system-critical folders.
Part 2. How to Clear Cache on Mac?
From removing app-specific cache to browser cache, this section covers 5 different methods to remove cache files Mac for different use cases.
Method A – Use 4DDiG Mac Cleaner (automation & safety)
If you prefer a one-click cleanup solution, an automated tool can help. The best Mac cleaner 2025, such as 4DDiG Mac Cleaner, provides guided scans to locate browser, system, and app caches. You can preview items before deleting, minimizing risk.
1.Begin by downloading and installing 4DDiG Mac Cleaner on your Mac and launching it. Select “Junk Files” and click “Scan” to start scanning.

2.Select the “cache” option and click “Smart Remove” to automatically remove unnecessary cache files. Once the process is complete, click “OK” and close the software.
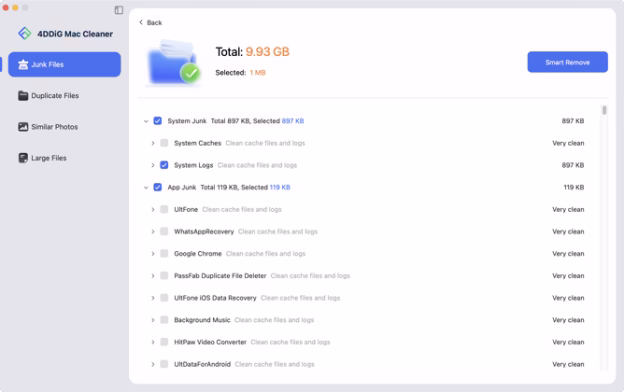
This option helps free up space in the Mac cache safely without going through folders manually. However, always back up important data before large deletions to keep it safe.
Method B – Clear browser cache (Safari, Chrome, Firefox)
Different browsers have different processes to remove cache files Mac, here, we have included the guide for the 3 most common Mac browsers:
Safari:
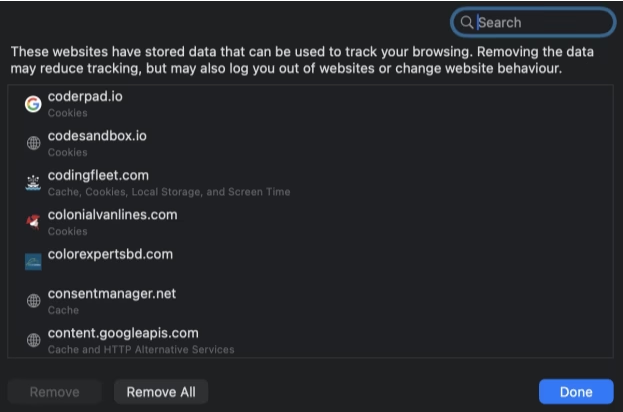
If Safari pages load incorrectly or shows outdated content. When you clear Safari cache Mac, it will help resolve the issue.
1.Open Safari and go to “Preferences”, then “Privacy”.
2.Click “Manage Website Data” and select “Remove All”. This deletes cache, cookies, and saved data.
3.Alternatively, go to “Preferences” and choose “Advanced”, then check “Show Develop menu”.
4.Click “Develop” then “Empty Caches”.
Note: You may be signed out of some sites. Use iCloud Keychain or a password manager to keep logins saved.
Chrome:
Chrome stores cached pages and media that can cause outdated content or crashes. The solution to this issue is to clear Chrome cache Mac with the following steps:
1.Open Chrome and click “options” then click “Delete Browsing Data”.
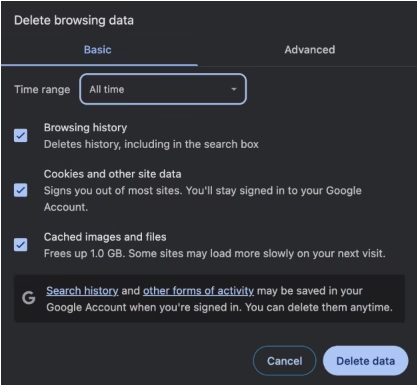
2.Check “Cached images and files” and choose “All time”, then click “Clear data”.
Now, you may restart Chrome and reload your pages.
Firefox:
Firefox can face display glitches if you have outdated cache files still saved. So, when you clear Firefox cache Mac, all such issues can be easily fixed,
1.Open Firefox and go to “Settings”, then “Privacy & Security”.
2.Under” Cookies and Site Data”, click “Clear Data”.
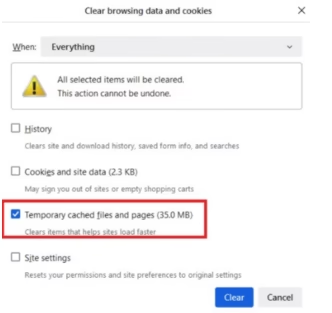
3.Now, select “Temporary cached files and pages” and “Everything” against “When”, then click “Clear”.
This helps fix display glitches or outdated pages without deleting bookmarks or history.
Method C – Delete user & system cache via Finder
When your whole system feels slow, manually deleting cache folders helps. These files live in your Library folders, and you can delete system cache Mac to make your system fast again.
Difference:
Before jumping into the steps, let us learn the difference between the system and user cache.
- User caches: ~/Library/Caches holds app-specific data.
- System caches: /Library/Caches holds system-level temporary data.
Now, lets discuss the steps on how to remove cache files Mac:
1.Quit all running apps.
2.In Finder, click “Go” then “Go to Folder” and type “~/Library/Caches”.
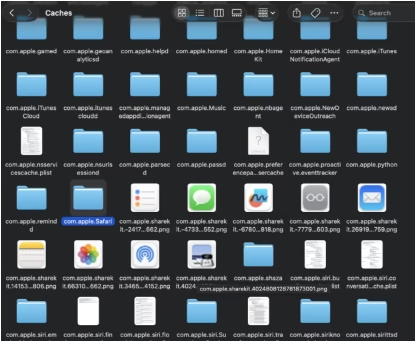
3.Open folders and delete obvious app caches like “com.apple.Safari, com.spotify.client”
4.Empty Trash by right-clicking on “Trash” and clicking “Empty Trash,” then restart to verify.
Safety tips:
- Avoid touching /System or other protected directories.
- When unsure, move folders to a temporary backup before deletion.
- Restart afterward for macOS to rebuild clean cache files automatically.
Method D – Flush DNS & network caches
When websites won’t load or you see “server not found” errors, the DNS cache may be outdated. When you flush DNS cache Mac, it forces macOS to fetch fresh network data.
Steps:
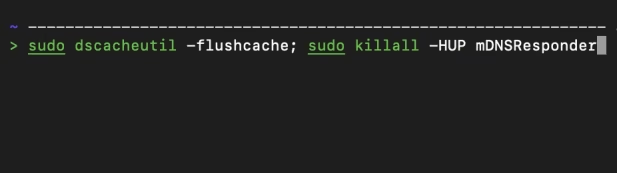
1.Open Terminal and copy/paste the command: “sudo dscacheutil -flushcache; sudo killall -HUP mDNSResponder” then press “Enter” to run it.
2.Enter your password when prompted and restart Safari or Chrome after the process is complete.
Note: This command works on most modern macOS versions. Always copy/paste carefully, as mistyped commands can fail. For basic issues, simply toggling Wi-Fi or rebooting also refreshes DNS.
Method E – Clear app caches & log files
Apps like Xcode, Spotify, and photo editors store large temporary files. Clearing them frees gigabytes of space.
1.Quit the app to clear the Mac app cache.
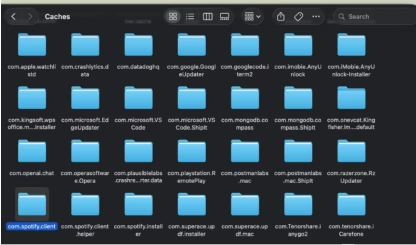
2.In Finder, go to “Go” and click “Go to Folder” and type: “~/Library/Containers” or “~/Library/Caches” to locate the app’s folder (e.g., com.spotify.client).
3.Delete the cache folder and empty the Trash.
4.For developer apps like Xcode, Open Xcode and go to “Preferences”
5.Go to “Locations” and choose “DerivedData”.
6.Click the arrow → and delete the folder.
7.To remove large logs, open “~/Library/Logs”, sort by size, and delete unnecessary ones.
Be cautious, as some apps may re-download data after clearing the cache. So, always note what you delete.
Part 3. Safe Mode, Recovery & advanced Tips
If your Mac has deep performance issues, you can boot into Mac Safe Mode clear cache feature automatically.
1.Shut down your Mac by clicking the “Apple” icon from the top left and clicking “Shut Down”.
2.Hold “Shift” while pressing the power button.

3.Release Shift when you see the login screen. Now, macOS will perform a diagnostic boot and clear temporary caches.
Safe Mode may take longer to start, but it’s safe. For major issues, enter Recovery Mode with Command + R and use the First Aid in Disk Utility to repair disks.
Safe Mode may take longer to start, but it’s safe. For major issues, enter Recovery Mode with Command + R and use the First Aid in Disk Utility to repair disks.
Part 4. Preventive tips & maintenance schedule
Regular cache maintenance keeps your Mac fast and tidy.
- Clear browser cache weekly if you browse heavily.
- Review ~/Library/Caches monthly for large folders.
- Use Time Machine or iCloud for automatic backups.
- Check Apple menu > About This Mac > Storage to monitor space.
- Use a trusted tool like 4DDiG Partition Manager periodically to free up space Mac cache safely.
Automation is fine, but periodic manual reviews ensure you don’t delete important data accidentally.
Conclusion
Caches are handy in that they can slow down your Mac when they are outdated, or they may create glitches. Now, you are aware of how to clear cache on Mac without harm, whether it is browser data or deep system and app caches.
In case of the fast cleanup, one may use the built-in tools or automated solutions such as 4DDiG Mac Cleaner to assist in previewing and deleting unnecessary files. Whichever method you use, it is always advisable to first back up, then clean intelligently and ensure your Mac runs smoothly in 2025.
Meta Description:
Learn how to clear cache on Mac safely from Safari and Chrome browser data to system, app, and DNS caches. Boost speed, fix errors, and free up space easily in 2025.