Lush, green lawns are the pride of many homeowners but brown patches and bird activity signal trouble. Lawn grubs, small white larvae, often hide beneath the surface and cause serious turf damage. Fortunately, you don’t need to tear up your yard to solve this problem.
Understanding the Lawn Grub Problem
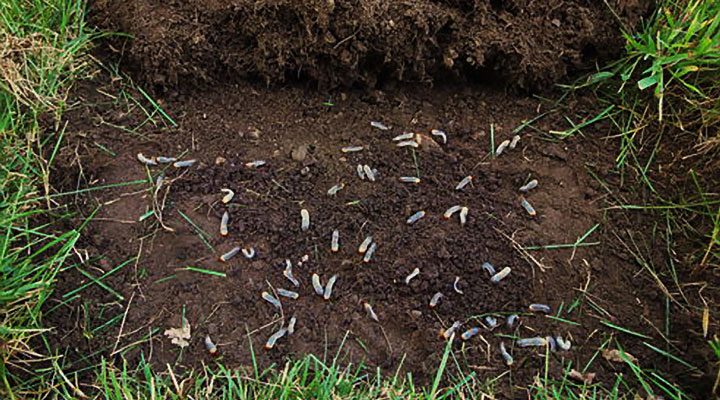
Lawn grubs are the larvae of various beetles, including the notorious scarab beetle. They live just below the soil surface and feast on the roots, cutting off the plant’s ability to take up water and nutrients. This leads to wilted, spongy turf and patchy brown areas that look as if they’ve been scorched by the sun.
What makes lawn grubs particularly sneaky is that they often go unnoticed until significant damage has already occurred. A few early warning signs include:
- Increased bird or animal activity on the lawn
- Grass that lifts easily from the soil like a loose carpet
- Rapidly spreading brown or yellow patches
If you spot these signs, it’s time to take action before the infestation worsens.
Why Acting Fast Matters
Grubs are most active during the warmer months when they feed aggressively and grow quickly. If left unaddressed, their damage can be severe enough to necessitate a full lawn replacement. Not only is that a costly fix, but it’s also time-consuming and frustrating for any homeowner who’s worked hard to maintain their lawn.
Beyond cosmetic damage, grubs can also attract larger pests like raccoons, magpies, or even bandicoots—animals that dig into your turf in search of a tasty grub meal, making the situation even worse.
The Natural Lifecycle of Lawn Grubs
To effectively combat these pests, it helps to understand their lifecycle:
- Eggs are laid in summer by adult beetles in moist, healthy lawns.
- Larvae (grubs) hatch within a few weeks and start feeding immediately.
- Pupae form in late spring, leading to the emergence of new beetles.
- The cycle then repeats, with grubs overwintering beneath the soil and causing damage again the following year.
Targeting grubs during the early larval stage is the most effective way to control their population and minimize turf damage.
Choosing the Right Grub Control Solution
When it comes to treating grub infestations, timing and product selection are key. One of the most trusted methods is the use of a specialized treatment designed to eliminate grubs quickly and efficiently without harming your grass.
Many homeowners have found success using Sevin’sSearle’s lawn grub killer, especially during the early stages of infestation. This product is known for its fast action, helping to stop grubs in their tracks while being gentle on your lawn. It’s typically applied via a spreader or watering can, depending on the formula, and works best when applied in the evening or after rainfall when grubs are closer to the soil surface.
How to Apply Lawn Grub Treatment
Treating your lawn isn’t complicated, but there are a few best practices that can ensure better results:
Check for Infestation
Before applying any product, lift a small section of turf and inspect the root zone for white, C-shaped larvae. If you find more than five grubs per square foot, it’s time to act.
Apply at the Right Time
Late spring to early summer is the ideal window for applying grub control treatments, as this is when newly hatched larvae begin feeding. Treating during this time allows for better absorption and a more significant impact.
Water In Thoroughly
After applying, it’s essential to water the area thoroughly. This helps the treatment penetrate the soil and reach the grubs where they reside.
Recheck and Repeat If Needed
After about two weeks, inspect the lawn again. If signs of damage persist or new grubs are present, a second application may be necessary.
Maintaining a Grub-Free Lawn
Once you’ve addressed grubs, prevent future outbreaks with strong lawn care: mow, water, fertilize, aerate, and monitor yearly.
Keep Your Lawn Healthy
Healthy, regularly maintained lawns are more resistant to pests, such as grubs.
Aerate the Soil
Aerate occasionally to reduce compaction and discourage egg-laying beetles. Avoid Overwatering
Avoid overwatering; grubs thrive in overly moist soil conditions.
Monitor Annually
ECheck for grubs annually early detection prevents widespread damage.The Payoff: A Greener, Stronger Lawn
There’s nothing more satisfying than stepping onto a lush, pest-free lawn. By tackling grubs early, using a proven solution like Searles Lawn Grub Killer, and practicing consistent lawn care, you ensure your yard stays green, healthy, and inviting throughout every season.
Remember, grub control isn’t a once-and-done task—it’s an ongoing commitment to your outdoor space’s health. Don’t wait for brown patches to appear. Act now: inspect your lawn for grubs, apply the correct treatment, and follow up with regular maintenance to ensure a lush, beautiful lawn that your whole family can enjoy.