When it comes to your new deck, knowing how to ensure proper sealing and staining is crucial. These steps protect your deck from weather damage, keeping it looking great for years. Sealing and staining help preserve the wood, prevent rot, and maintain that fresh, vibrant look.
Taking the time to properly seal and stain your deck not only boosts its appearance but also extends its life. Whether you’re a first-time deck owner or looking to refresh an old one, this simple process can make a big difference.
Why Sealing and Staining Your New Deck Matters

Sealing and staining your new deck matters more than you might think. Without proper care, your deck can quickly fall victim to the elements, losing its beauty and strength. That’s why it’s essential to work with skilled deck contractors Toronto who can help protect your investment and ensure its longevity. Let’s dive into why this simple step is so important.
Protection Against the Elements
Your deck faces all kinds of weather, from hot sun to heavy rain. Sealing and staining act as a shield, protecting the wood from moisture, UV rays, and even mold. Without these layers of protection, the wood can absorb water, leading to rot, warping, and discoloration.
Boosts Durability and Lifespan
By sealing and staining your deck, you’re increasing its lifespan. These treatments help prevent cracking, splitting, and fading, ensuring your deck stays strong and looking good for longer. A well-maintained deck can last years, even decades, if cared for properly.
Keeps It Looking Great
Let’s face it; no one wants a deck that looks old and weathered. Staining not only protects the wood but also enhances its natural color, giving your deck a beautiful, polished finish. Whether you prefer a rich, deep tone or a natural look, staining makes your deck more inviting.
Step-by-Step Guide to Sealing and Staining a New Deck
Sealing and staining your new deck is a rewarding task that will keep it looking beautiful and protected for years. Follow this simple step-by-step guide to ensure a flawless finish.
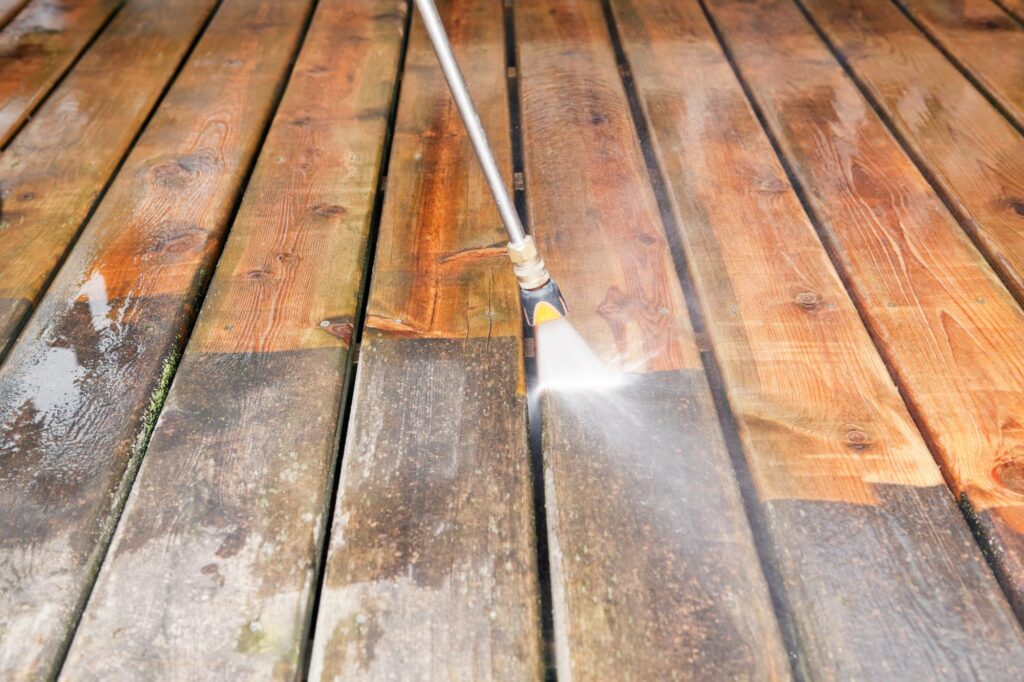
1. Clean the Deck Surface
Before you start, make sure your deck is free of dirt, dust, and old finishes. Use a deck cleaner or wood detergent to remove grime and mildew. Scrub the surface thoroughly with a stiff brush or use a pressure washer for a deeper clean. Allow the deck to dry completely before moving to the next step.
2. Sand the Deck (If Necessary)
If your deck has rough spots or splinters, lightly sand it to smooth the surface. This helps the stain and sealer to adhere better. Make sure the deck is completely dry after sanding to avoid any moisture being trapped beneath the stain.
3. Choose the Right Stain and Sealer
Pick a stain and sealer suited to your deck’s wood type and your local climate. There are transparent, semi-transparent, and solid stains, each offering different levels of color and protection. Make sure to select a high-quality product for the best results.
4. Apply the Stain
Use a brush, roller, or sprayer to apply the stain to the deck. Start from one end and work your way across, making sure to apply an even layer. Avoid pooling stain by working in small sections and wiping away any excess.
5. Seal the Deck
Once the stain has dried (check the manufacturer’s drying time), apply a coat of deck sealer to protect the wood from water damage. Use the same technique to apply the sealer evenly across the deck.
6. Allow to Dry and Cure
Let your deck dry completely before using it. This process can take anywhere from 24 to 48 hours, depending on weather conditions. Be patient and avoid walking on the deck during this time to prevent damage to the finish.
Common Sealing and Staining Mistakes to Avoid
Sealing and staining your deck might seem straightforward, but there are several common mistakes that can ruin the results. Here’s a guide to help you avoid these errors and achieve a beautiful, long-lasting finish.
1. Sealing Too Soon
One of the biggest mistakes is sealing your deck before it’s fully ready. If you try to seal the wood too soon; especially if it’s newly installed; you risk trapping moisture inside the wood, which can lead to mold and rot. Wait until the deck is completely dry before applying any sealant.
2. Skipping Surface Preparation
Never skip the cleaning and sanding steps! If your deck isn’t properly cleaned, dirt and old finishes can prevent the stain and sealer from sticking properly. Sanding the surface removes rough spots, ensuring a smooth finish that the stain can properly absorb.
3. Using the Wrong Stain or Sealer
Not all stains and sealers are created equal. Choosing the wrong type for your deck’s wood or your local climate can lead to poor protection and fading. Be sure to select a product that’s designed for outdoor use and appropriate for your deck’s material (whether it’s pressure-treated wood, cedar, or another type).
4. Applying Too Much or Too Little Stain
Applying too much stain can result in a sticky, uneven finish, while not enough will leave your deck looking patchy. Aim for an even, thin layer, and work in small sections. Wipe away any excess stain before it dries to avoid streaks and blotches.
5. Ignoring Weather Conditions
Sealing and staining your deck during the wrong weather conditions can lead to poor results. Avoid applying stain or sealer on extremely hot, rainy, or windy days. Ideal conditions are mild temperatures with low humidity, allowing the products to cure properly without being rushed by harsh weather.
Long-Term Maintenance Tips for a Beautiful Deck Finish
Once your deck is sealed and stained, the work isn’t over. To keep your deck looking its best and to protect your investment, it’s important to maintain it over time. Here are some long-term maintenance tips to ensure a beautiful deck finish for years to come.
1. Regular Cleaning
Make cleaning a routine part of your deck’s upkeep. Sweep the surface regularly to remove debris like leaves, dirt, and twigs that can cause damage over time. In addition, wash the deck once or twice a year with a wood cleaner to remove dirt and mildew buildup, keeping the surface fresh.
2. Reapply Stain and Sealer as Needed
The stain and sealer on your deck will eventually wear down due to sun exposure, rain, and foot traffic. Generally, you’ll need to reapply a fresh coat of stain and sealer every 1 to 3 years, depending on weather conditions and how much use your deck gets. Look for signs of fading, peeling, or water not beading on the surface, indicating it’s time for a refresh.
3. Inspect for Damage
Regularly inspect your deck for signs of damage like cracks, splinters, or loose boards. Early detection helps prevent bigger problems like water damage or structural issues. If you spot any problems, repair them promptly to avoid costly fixes down the road.
4. Protect Against Weather
To reduce weather-related damage, consider using a deck cover during the off-season. In colder climates, removing furniture and covering your deck can protect it from snow and ice. In hot climates, using a sunshade can reduce the harsh effects of UV rays.
5. Maintain Proper Drainage
Ensure that water isn’t pooling on your deck after rainfall. Check that gutters and downspouts are clear and that the deck has proper drainage. Stagnant water can cause wood to warp or rot, so keeping your deck dry is key to its long-term health.
6. Use Furniture Pads and Rugs
Placing furniture pads under heavy items like chairs and tables helps prevent scratching and denting. Outdoor rugs can also protect the deck from damage caused by furniture or food spills.
By following these long-term maintenance tips, you can extend the life of your deck, keeping it beautiful, functional, and safe for years.
Conclusion
In conclusion, sealing and staining your deck is the key to a long-lasting, beautiful outdoor space. With the right products and care, you’ll protect your investment from harsh weather and wear. Keep up with regular maintenance, and your deck will be the envy of the neighborhood for years to come.