You took a photo that looks perfect, but then you notice the blur. It is a common problem that ruins many great shots. You might think that the photo is lost forever because of a shaky hand or a moving subject. Luckily, you can turn a blur to clear image free without needing any special skills. Modern technology has made it possible to fix these mistakes in just a few seconds.
The best way to handle this is by using an ai photo editor free that specializes in image restoration. These tools use smart algorithms to look at the blurry parts of your picture. They compare the blurry pixels to millions of other images to figure out what the sharp version should look like. You don’t have to pay for expensive software or spend hours learning how to use complex tools.
Step-by-Step Guide to Fixing Blurry Photos
Step 1: Choose the Right Image for Restoration
Not every blurry photo can be saved, but most of them can be improved. You should start by picking a photo that has a clear subject, even if it looks fuzzy. If the photo is completely black or just a smudge of colors, the AI might struggle to find the details. Look for images where you can still see the basic shapes of faces, objects, or landscapes. The AI works best when it has a foundation to build upon.
Step 2: Upload Your Photo to the Editor
Once you have your photo ready, you need to get it into the editing tool. Most online tools have a simple button that says upload or a box where you can drag and drop your file. You should make sure your file is in a common format like JPG or PNG. These formats are easy for the software to read. If your file is very large, it might take a moment longer to process, but the results are usually better because there is more data for the AI to analyze.
Step 3: Select the Unblur or Sharpen Tool
After your photo is uploaded, you will see a menu of different options. You want to look for a tool labeled unblur, sharpen, or enhance. Some editors have a specific button for AI restoration. When you click this, the software starts to scan the image. It looks for edges that are soft and tries to make them crisp. It also looks for noise, which is the grainy texture you often see in dark photos. The AI will try to smooth out the noise while keeping the important details sharp.
Step 4: Adjust the Intensity of the Effect
Most AI tools give you a slider to control how much sharpening is applied. It is tempting to move the slider all the way to the maximum, but that can make the photo look unnatural. You should move the slider slowly and watch how the image changes. You want the edges to look sharp without creating weird artifacts or glowing lines around objects. If the photo starts to look like a painting or a cartoon, you have probably gone too far. Aim for a balance that looks realistic.
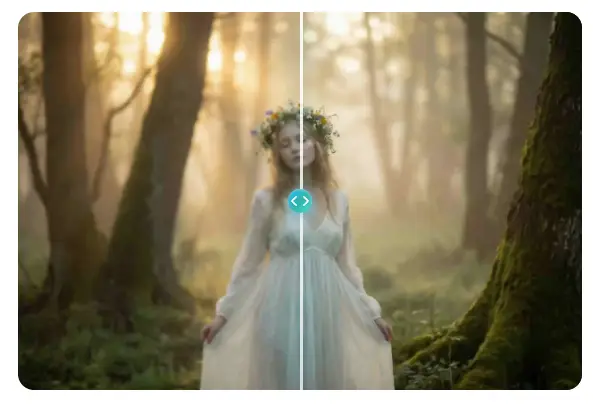
Step 5: Preview and Compare the Results
Before you save your work, you should use the preview feature. Most editors have a toggle that lets you see the before and after versions of your photo. This is the best way to see if you actually improved the image. Sometimes we get used to the sharpened version and forget how the original looked. By switching back and forth, you can see if the AI added details that were missing or if it just made the existing blur look different.
Step 6: Download Your Clear Image
If you are happy with the way the photo looks, it is time to save it. Look for a download or export button. You might have the option to choose the quality or the file type. It is usually best to save it at the highest quality possible so you don’t lose any of the new details the AI created. Once the download is finished, you can share your clear photo on social media or print it out for a frame.
Tips and Best Practices for Better Results
To get the most out of your AI editing experience, you should follow a few simple rules. These tips will help you avoid common issues and ensure your photos look as good as possible.
| Feature | How It Works | Why You Need It |
| De-blurring | Sharpens soft edges | Fixes camera shake |
| Denoising | Removes grainy spots | Cleans up low-light shots |
| Upscaling | Adds more pixels | Makes small photos larger |
| Face Fixer | Enhances facial details | Makes portraits look clear |
One of the most important things is to start with the highest resolution version of the photo you have. If you downloaded a photo from a messaging app, it might be compressed and small. Try to find the original file from the camera or phone that took the picture. More pixels mean the AI has more information to work with, which leads to a much cleaner result.
You should also pay attention to the lighting in your photo. AI tools can do amazing things, but they struggle with photos that are too dark or too bright. If a photo is completely blown out with white light, the details are gone forever. If it is too dark, you might want to adjust the brightness and contrast before you try to unblur it. A well balanced photo is much easier for the software to fix.
Another tip is to use the AI tools sparingly. It is better to run the process twice at a low setting than once at a very high setting. This gives you more control over the final look. You can also combine different tools. For example, you might use a noise remover first and then use the unblur tool. This layering approach often creates a more professional look than using a single one click solution.
Common Mistakes to Avoid
Many people get frustrated with AI editors because they make a few simple mistakes. If you avoid these, you will have a much better time fixing your images.
The first mistake is expecting the AI to fix a photo that is completely out of focus. If the camera was focused on the background instead of the person in the front, the person will be a big blur. AI can sharpen a slightly blurry face, but it cannot recreate a face that is just a blob of color. You have to be realistic about what the technology can do.
Another mistake is over-sharpening. This happens when you turn the settings up too high. It creates white outlines around people and objects. It can also make skin look like plastic or stone. If you see these things happening, turn the intensity down. A slightly soft photo often looks better than a photo that has been over-processed and looks fake.
People also forget to check the background of their photos. Sometimes the AI focuses so much on the main subject that the background starts to look strange. It might create weird patterns or textures in the sky or on walls. Always look at the whole image before you save it. You want the entire photo to look cohesive and natural.
Finally, don’t ignore the file size. Some free tools might shrink your photo when they process it. If you start with a large photo and end up with a tiny one, you won’t be able to print it or see the details clearly. Always check the dimensions of the final file to make sure it is still high quality.
Conclusion
Fixing a blurry photo used to be a job for experts, but now anyone can do it. By using a free AI editor, you can save your favorite memories and make them look sharp again. The process is fast and simple. You just need to upload your photo, let the AI do its work, and adjust the settings until you are happy.
If you follow the steps in this guide, you will be able to turn your fuzzy shots into clear images. Remember to start with a good file, use the settings carefully, and avoid over-sharpening. With a little bit of practice, you will know exactly how to get the best results every time. You don’t have to let a shaky hand ruin your photos anymore. Give these tools a try and see how much your images can improve.