Recover Unsaved Word Documents Easily with Proven Word Document Recovery Methods
You’ve just finished working on an important report when Word crashes, the power goes out, or you accidentally click “Don’t Save.” It feels like everything is lost. But that’s not the case. An unsaved Word document is still recoverable. In this guide, we’ll talk over 6 ways to recover unsaved Word document on Windows based on different situations. You’ll also learn the reasons why Word files can go missing, and tips to prevent losing them again.
Key Takeaways
- You can recover unsaved Word documents using tools like AutoRecover, temporary files, Previous Versions, OneDrive, or Word’s Repair feature.
- If built-in methods fail, recovery software like 4DDiG can scan deeper and restore deleted or lost Word files.
- Different methods work for different problems, like crashes, power cuts, accidental deletion, or file corruption.
- OneDrive and AutoRecover help prevent loss by saving copies automatically if enabled.
- To avoid future loss, save often, use cloud backup, keep Office updated, and enable AutoRecover settings.
Part 1: Why Does a Word Document Become Unsaved or Lost?
It helps to understand the reason for a Word document to become unsaved or lost because the cause often determines which recovery method will work best for you. Here are the popular reasons behind this issue:
- Word crashes: Microsoft Word may suddenly close because of add-ins, bugs, or memory issues.
- Computer restarts or shuts down: Unexpected shutdowns, restarts, or Windows Updates can interrupt your work.
- File closed without saving: Word document is not saved if you accidentally clicked “Don’t Save” or closed the laptop before saving.
- Power outage: Losing power while editing can cause unsaved work to disappear.
- System freeze: A frozen computer or software conflict may force a hard restart.
- Temporary files removed: Windows or cleanup tools may automatically delete unsaved temp files.
- File corruption: Sudden drive disconnection, bad sectors, or incomplete transfers can damage Word files.
- Accidental deletion: A saved document may be deleted from its folder by mistake.
Here are the frequent symptoms that indicate there’s an issue with your Word document:
- Your Word document disappears entirely after a crash or forced shutdown.
- Word displays a “Document not saved” error when you try to recover it.
- You cannot find a recently edited file in its expected folder or the recent list.
- The AutoRecover pane doesn’t appear when Word restarts, or it shows an empty list.
- Word opens a completely blank document instead of your recovered draft.
Important Note: The moment you realize a Word document is missing, stop saving new files to the same drive. Writing new data can overwrite the sectors where your lost document is stored, making recovery significantly harder.
Part 2: How to Recover Unsaved Word Documents?
Here’s how to restore unsaved Word document on Windows 10/11 in 7 ways. Each method suits a different situation. So, pick according to your needs:
Fix 1 – Recover Unsaved Word Document from AutoRecover
AutoRecover is a Microsoft Word feature that automatically saves temporary copies of your document every few minutes. If Word crashes or closes before you save, you may still recover your work from these files.
It’s the quickest and easiest method to try after a crash or forced restart, especially if AutoRecover was enabled. In some cases, Word will automatically show the recovery panel when reopened. Follow the steps beneath to recover unsaved Word document with AutoRecover:
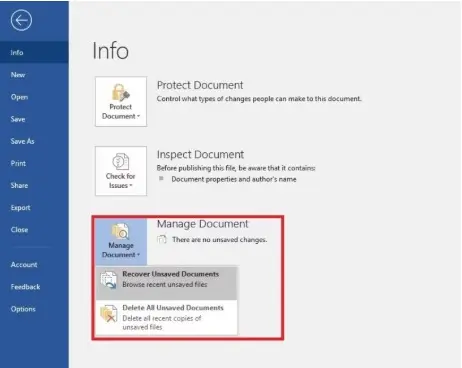
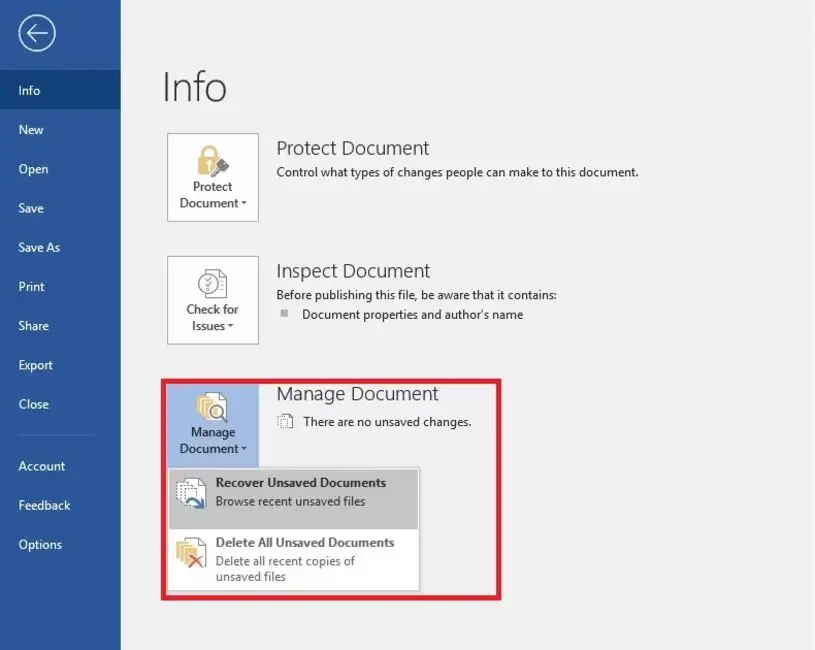
Step 1: Open Microsoft Word (do not open a new document. Let Word load normally). Click “File” in the top-left corner. Then, select “Info.”
Step 2: Click “Manage Document” (or “Manage Versions” in older Word versions). Select “Recover Unsaved Documents” from the dropdown menu.
Step 3: A file browser opens, pointing to Word’s “AutoRecover” folder. Locate your file.
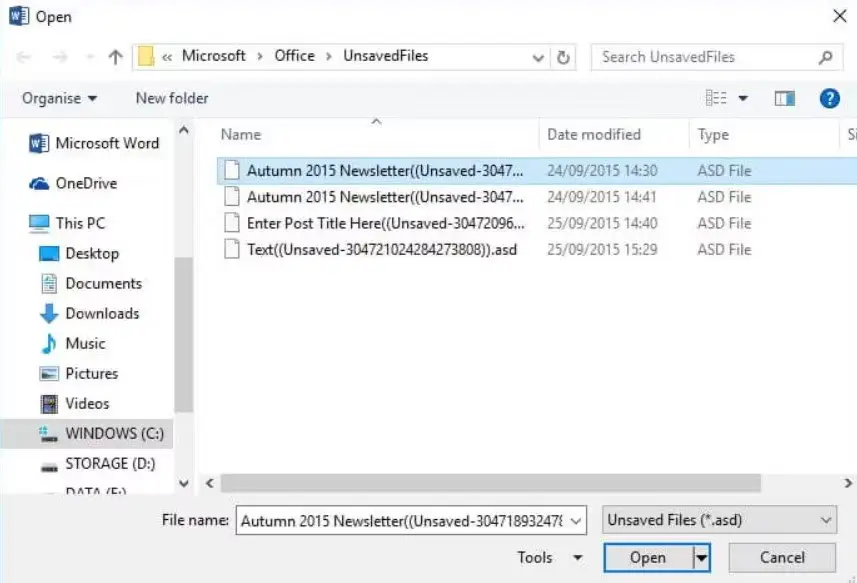
Step 4: Open the recovered file, review the contents, then immediately click “Save As” to a permanent location.
Fix 2 – Restore Word File from Temporary Files
While you work in Word, Windows creates temporary files such as .asd, .tmp, and .wbk files in the background. Even if Word does not automatically recover your document, these files may still be stored in the “Temp” folder. Manually searching for them can help recover documents that the “AutoRecover” panel did not show. Here’s how to restore a Word file from temporary files:
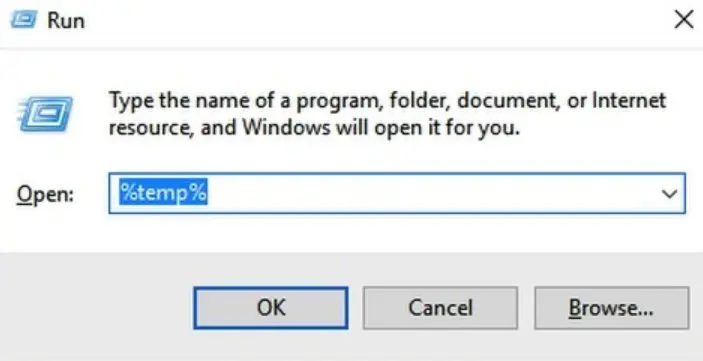
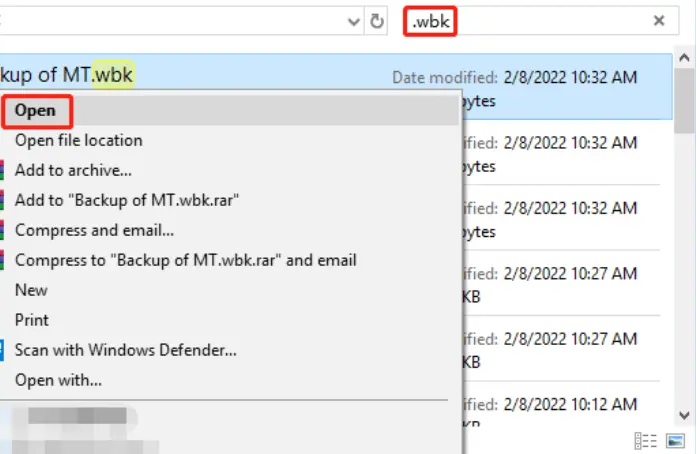
Step 1: Press the “Win + R” keys on your keyboard. This will open the “Run” dialog. Type “%temp%.” Press “Enter.” This opens Windows’ “Temp” folder.
Step 2: In the search box (top right), search for “.tmp,” “.asd,” or “.wbk.” Sort results by “Date Modified” to find the most recently changed files.
Step 3: Right-click a promising file and choose “Open With.” Select “Microsoft Word.” If your content appears, immediately save the file to a safe location with “File” and “Save As.”
Step 4: Also check this path for AutoRecover files: C:\Users\[YourName]\AppData\Roaming\Microsoft\Word. The “AppData” folder is hidden by default. Enable “Show hidden items” in “File Explorer View” settings to access it.
Fix 3 – Recover Previous Version of Word Document
In case your Word document was saved before it was lost, damaged, or overwritten, Windows may have stored an older version using “File History” or “System Protection.” This lets you restore a previous copy of the file, which is useful if recent changes were lost.
But this feature only works if “File History” or “System Protection” was enabled before the problem happened. To check, search “System Protection” in the Windows “Start” menu and verify it’s turned on for your drive. If it’s enabled, here’s how to restore the previous version of your Word document:
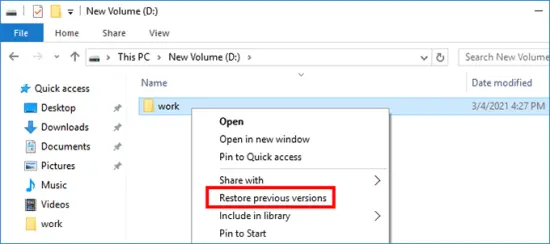
Step 1: Head to the folder where the Word document was saved. Right-click the file (or the folder, if the file is gone). Choose “Properties.”
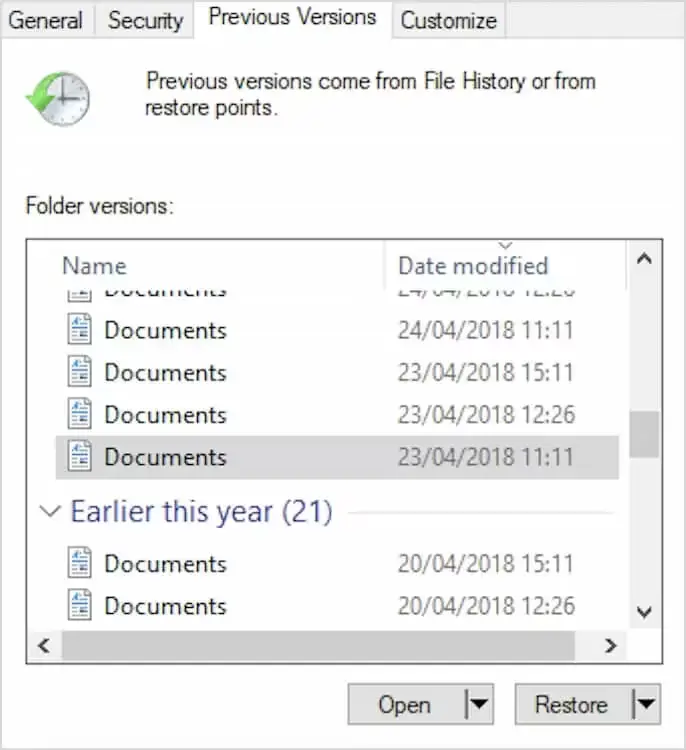
Step 2: Choose “Restore previous versions.” Next, click the “Previous Versions” tab at the top of the “Properties” window.
Step 3: Browse the list of available snapshots. These are timestamped version copies. Select the version closest to when your document was last in good shape.
Step 4: Tap “Restore” to overwrite the current file, or “Open” to preview before restoring.
Fix 4 – Use Word Document Recovery Software (Best Solution)
If built-in Word document recovery methods don’t do the job, it usually means your file is still on the drive. But Windows can’t locate it anymore. Temporary and AutoRecover files may already be deleted, and saving new data can overwrite the lost file. In this case, data recovery software is an appropriate choice.
Recovery tools use deep scanning to find hidden file data that Windows no longer tracks, and they can even retrieve Word files from formatted or damaged drives. One well-known option is 4DDiG Data Recovery, which is designed to restore numerous file types, including Word documents, through a simple interface that doesn’t require technical skills.
Main Features of 4DDiG Word Recovery:
- Recovers unsaved Word documents lost due to crashes, power failures, or sudden shutdowns
- Retrieves permanently deleted Word files even after emptying the Recycle Bin.
- Restores formatted, corrupted, or inaccessible Word files that Word itself cannot open.
- Supports internal/external drives, including USBs, SD cards, digital cameras, drones, HDDs, SSDs, etc.
- Offers a free preview of recovered files before you commit to restoring them.
- Provides Quick Scan and Deep Scan modes, where Deep Scan digs deeper to find files that other simpler tools miss.
- Supports Windows 11, and earlier versions, as well as major file systems including NTFS and FAT32
- Can recover up to 2GB of data completely free for Windows users.
Steps to Use 4DDiG to Retrieve Unsaved or Lost Word Files:
Step 1: Download and install 4DDiG on your computer. Then, launch the application.
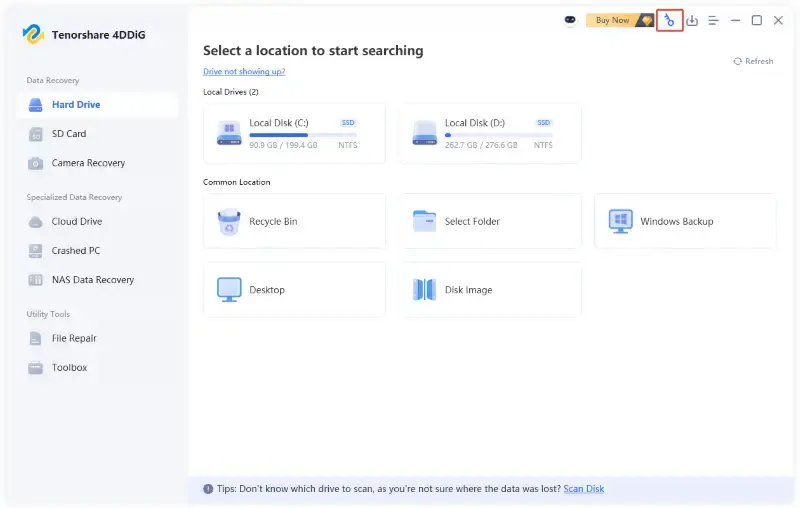
Step 2: On the interface, select the drive or location where your Word file was stored or last accessed. Hit “Scan.”
Step 3: Once scanning is underway, use the filter panel to narrow results by file type. Select Documents to isolate “DOC” and “DOCX” files.
Step 4: Preview the recovered Word documents in the “Document” folder beneath the “Type” tab to confirm they contain the Word files you need.

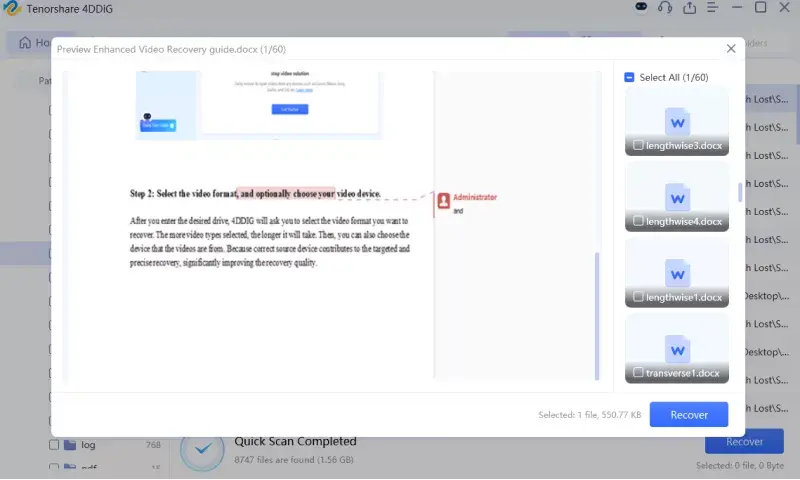
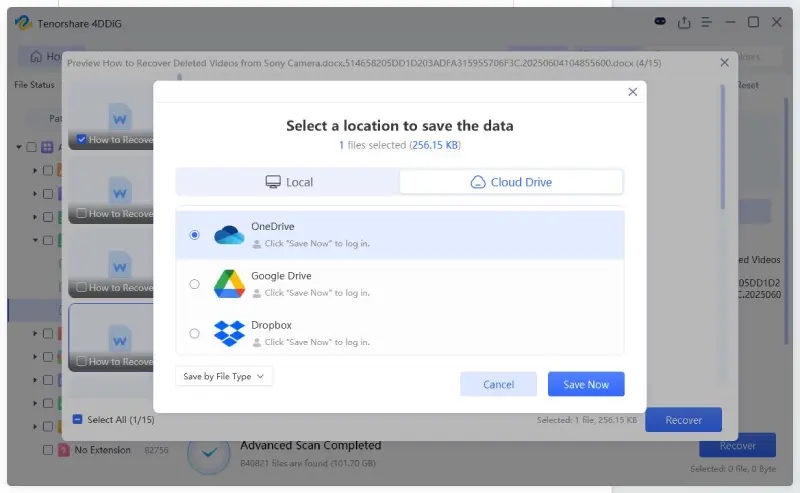
Step 5: Select the files you want back. Hit “Recover.” Save the restored documents to a different drive or location than where they were lost.
Note: Choose “Deep Scan” for more thorough results if “Quick Scan” doesn’t find your file.
Fix 5 – Recover Word Document from OneDrive
If you use OneDrive with AutoSave turned on, your Word file may be saved automatically in the cloud. Microsoft 365 often enables this for files stored in OneDrive, so your work is backed up.
Even if you delete the file, you can usually recover it from OneDrive’s Recycle Bin within 30 days. This only works if the file was saved in OneDrive, not just on your computer. Follow the instructions beneath to recover lost Word file from OneDrive:
Step 1: Head to “onedrive.live.com.” Log in with your Microsoft account.
Step 2: Click the “Recycle Bin” in the left sidebar to check for recently deleted Word files.
Step 3: Alternatively, use the search bar at the top to search for the document’s name or keywords from its content.
Step 4: If you find the file, right-click it and choose “Restore.” It will return to its original location.

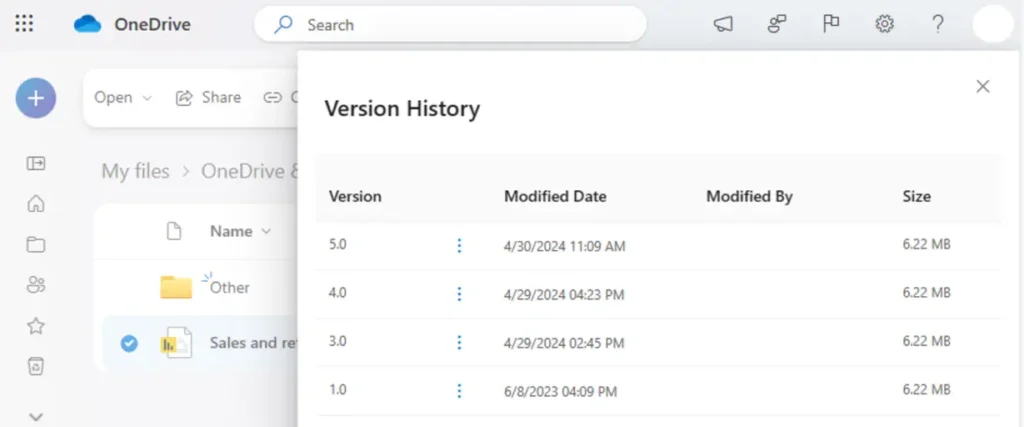
Step 5: For version history on a file still in OneDrive, right-click it and select “Version History” to roll back to an earlier draft.
Fix 6 – Repair Corrupted Word Documents
Sometimes the Word file is not missing but damaged and won’t execute properly. This can happen due to a power failure while saving, disk errors, or system issues. Word has a built-in repair option for such files.
It is useful when a DOC or DOCX file is visible but won’t open, shows broken content, or causes Word to freeze. You can also try copying the file, changing its extension to .zip, and opening it to access the text inside, which may help recover your data. Here’s how to repair a corrupted Word document:
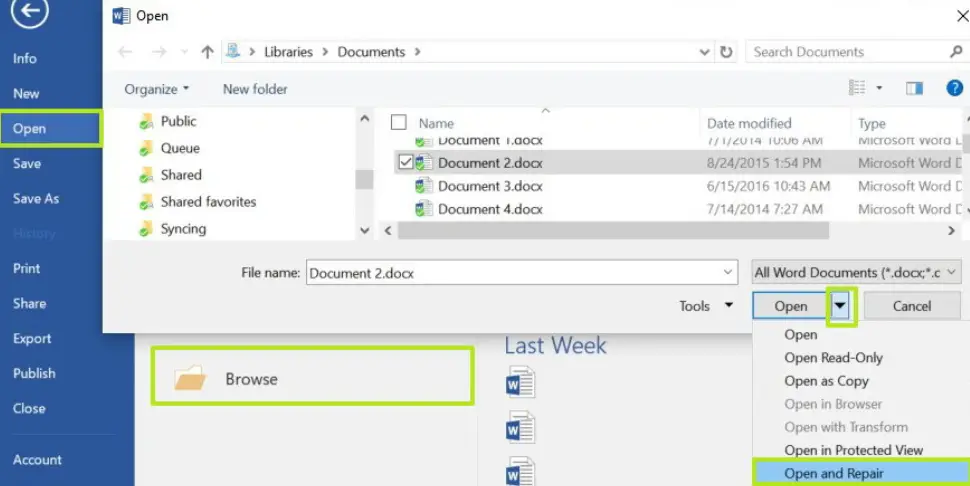
Step 1: Open Microsoft Word (start from the app itself, not by double-clicking the file). Then, click “File.” Choose “Open.” Upload the corrupted document.
Step 2: Select the file. But do not double-click to open it yet. Tap the small dropdown arrow next to the “Open” button in the bottom-right corner.
Step 3: Choose “Open and Repair” from the dropdown. Word will attempt to fix structural issues in the file and open it.
Step 4: If successful, immediately “Save As” to a new file name to preserve the repaired version.
Part 3: How to Prevent Losing Unsaved Word Documents
Recovery methods are powerful, but prevention is always the better strategy. The following habits and settings will protect your work from the most frequent causes of Word document loss on Windows 10/11:
- Turn on “AutoSave” and “AutoRecover,” as they are your main protection against data loss.
- Save often with “Ctrl + S,” especially after making big changes or switching tasks.
- Save files in OneDrive-connected folders for automatic cloud syncing.
- Avoid forced shutdowns and always shut down properly using “Start” and “Shut Down.”
- Keep Microsoft Office updated to fix bugs and reduce crashes.
- Regularly back up files to an external drive or another cloud service.
- Use a UPS (Uninterruptible Power Supply) if you often face power cuts on a desktop.
- In Word, open “File.” Choose “Options.” Tap “Save.” Set “Save AutoRecover information every” to 3 minutes. Check “Keep the last AutoRecovered version if I close without saving.” Hit “OK.”
- Choose an “AutoRecover” folder that is easy to find for manual recovery.
Final Words
It’s possible to recover unsaved Word document on Windows depending on different situations. You can try AutoRecover for unsaved work, temporary files for hidden drafts, and Previous Versions for older saved copies.
Other options you can choose are the OneDrive Recycle Bin for cloud files, and Word’s Open and Repair for damaged documents. If these don’t do the job, try a tool like 4DDiG Data Recovery. It can dig deeper and retrieve deleted files, even from formatted or failing drives, and let you preview them first.